

How to Install EZ-On Grid Covers
EZ-On Drop Ceiling Grid Covers are exactly what their name implies - the easiest way to make your old standard (15/16 in. to 1 in.) grid look like new. Made from 100% recyclable rigid vinyl, they color match all of Ceilume's white ceiling tiles, slide-on easily over clean or dirty grid, and require no special tools or adhesive to install.
Wall Angle Covers install everywhere your grid runs along a wall, and Main Covers install along your suspended ceiling's main beams and cross T's (basically every section that does NOT run along a wall).

EZ-On Wall Angle Covers
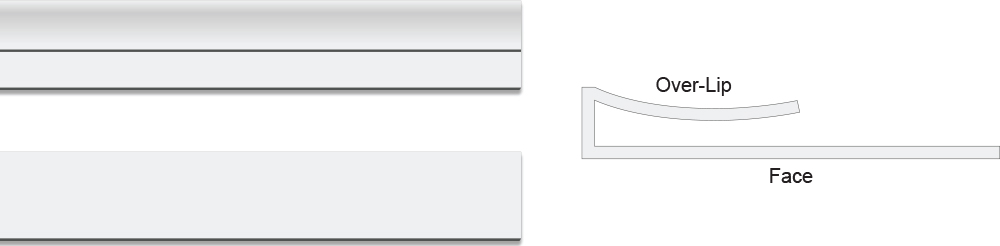
EZ-On Wall Angle Covers install along the edge of your ceiling, everywhere your grid touches a wall. They are cut to fit perimeter portions of ceiling grid, and have an over-lip along their length which holds them firmly in place.
To install, simply slide them onto the portion of your grid running along the perimeter of your ceiling.
If you have a 2 ft. x 2 ft. ceiling layout, you'll need one cover for each section. If you have a 2 ft. x 4 ft. ceiling layout, you'll need three covers (two and a little bit extra) for each section. In the case of a 2 ft. x 4 ft. layout, there are no hard-fast rules, any combination of wall angle cover lengths you think looks best will work.
If your ceiling has any outside corners, your wall angle covers can simply be trimmed to fit and slid into place. For inside corners, if the corner isnt riveted, just trim to fit and let the covers overlap. If the corner is riveted, trim off a section of the over-lip to create a tab that will cover the exposed grid section in the very corner.
When your wall angle covers are all installed, your perimeter grid will still not be completely covered; there will be a gap where your ceiling grid mains connect to your wall angle. These gaps will be covered by the tabs on your main/feature grid covers.
EZ-On Main Covers
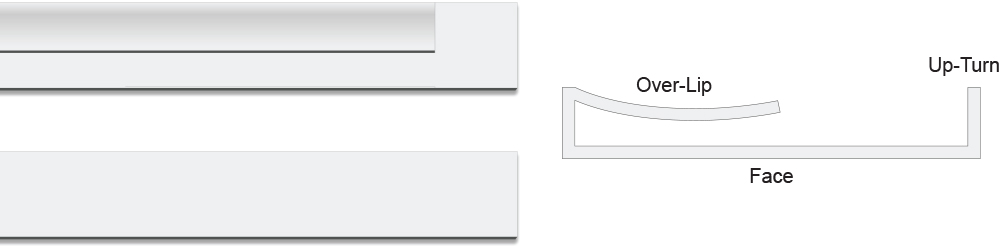
To install, simply slide them onto your ceiling mains or T's and click them into place. Once installed the tabs cover the exposed sections of grid at intersections and the gaps between wall angle covers.
If you have a 2 ft. x 4 ft. ceiling layout, you have a few options. You can use two covers, which has the benefit of less material/cost but leaves a small amount of the grid edge exposed, or three covers (two and a little bit extra; any combination of lengths will work), which provides better grid coverage.
From here on out, things are pretty self-explanatory, but here are some tips for the best results:
- You can begin your installation of main covers wherever you want and proceed in any sequence, but if you start with the outer portions first you'll get most of your trim work out of the way in the beginning, as the grid sections in this area are usually less than full length.
- Wherever possible, try not to install a main cover with the tab end covering the gap between two pieces of grid. You will need to do so in some places, every grid just sort of works out that way, but the more you can keep the tabs on smooth, uninterrupted sections of grid, the flatter the tabs will lie, and the better your finished ceiling will look.
- You will have more tab ends than you need; don't worry! When you come to a section of grid where no tab is needed, simply trim it off.
